Do you love to travel? Do you want to share your experiences with others? Well why don’t you start a travel blog and reach more people. (and possibly make some coin in the process)
Did you know 33% of US travelers turn to travel blogs for traveling advice?
Did you know at the time of this article 2022, according to what was shown on ziprecruiter.com, the AVERAGE travel blogger salary is $63,173 a year?
Those are just a couple of fun facts but the question is How do you make a travel blog?
In this article we’re going to take you from start to finish on everything you need to get one started.
Speaking of getting started, let’s get on with it.
The Only 3 Things You’ll Need To Create a Kickin’ Travel Blog
Besides the awesome videos and sweet photographs you’re going to be taking, here are the 3 things for your travel blog you’re going to need to make it happen.
- A Domain Name – this is what people will type into their web browser to find your travel blog, brainstorm for a name. You want to pick something memorable, creative and unique!
- Web Hosting – this is where all of your articles, images, videos and well, basically everything for your blog are stored.
- About an Hour – this is a rough guestimate but following the steps below, there shouldn’t be any reason to not get one all set up in 30 minutes to an hour.
Here’s the step-by-step:
The video below will take you from an idea to a brand new travel blog in about an hour!.
Step 1 : Purchase Hosting and Domain Name
Hosting is important because… well, without hosting your travel blog wouldn’t be viewable to anybody. There are numerous hosting companies out there and one day we’ll make a complete list but since this is probably your first blog let’s keep it simple and economical.
A good company to use for your travel blog’s web hosting is HostGator . They have a good track record for uptime, have great customer support and have been around for a long time, not to mention they are very affordable.
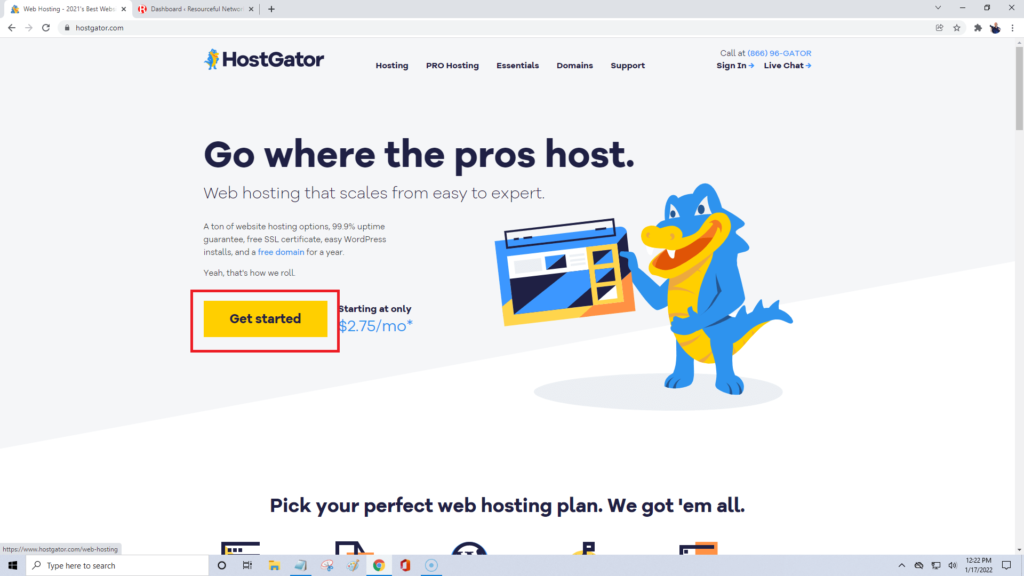
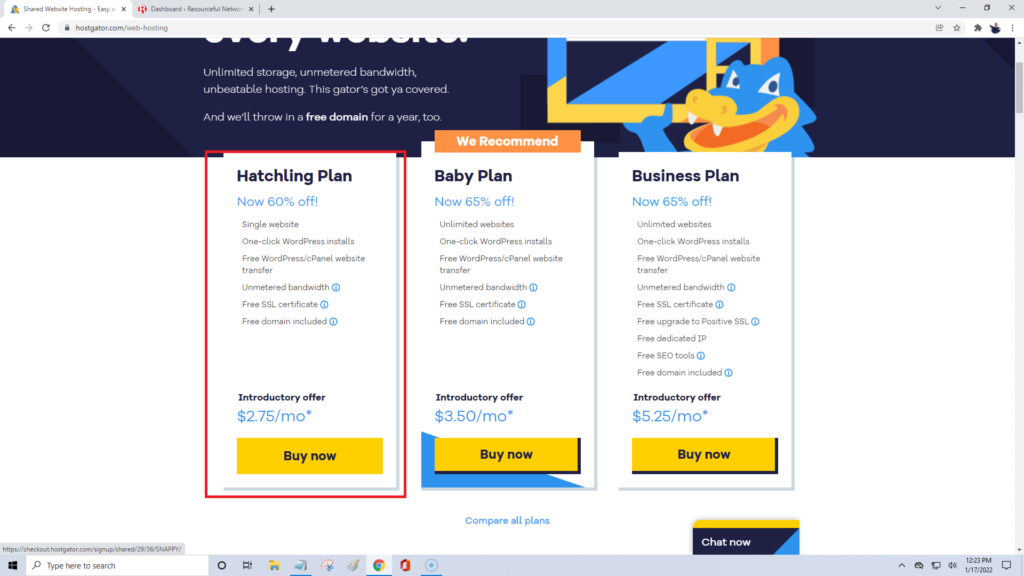
Click the Get Started button and then select the buy now on the hatchling plan package. You can upgrade to the baby plan if you are going to build more than one website if you choose.
Step 2: Get a Domain Name
Your domain name should be simple and easy to remember, it could even be your own name if you wanted. If you are stuck picking out a name, there are a few blog name generators out there that can help jog your brain a little.
Once you have your blog name picked out we need to see if it’s available and purchase it. A domain name is generally around $15 a year. We have used GoDaddy.com, Namecheap.com and HostGator.com for domain names in the past. Currently we rely on HostGator for all of our domain name and web hosting needs. They have never let us down.
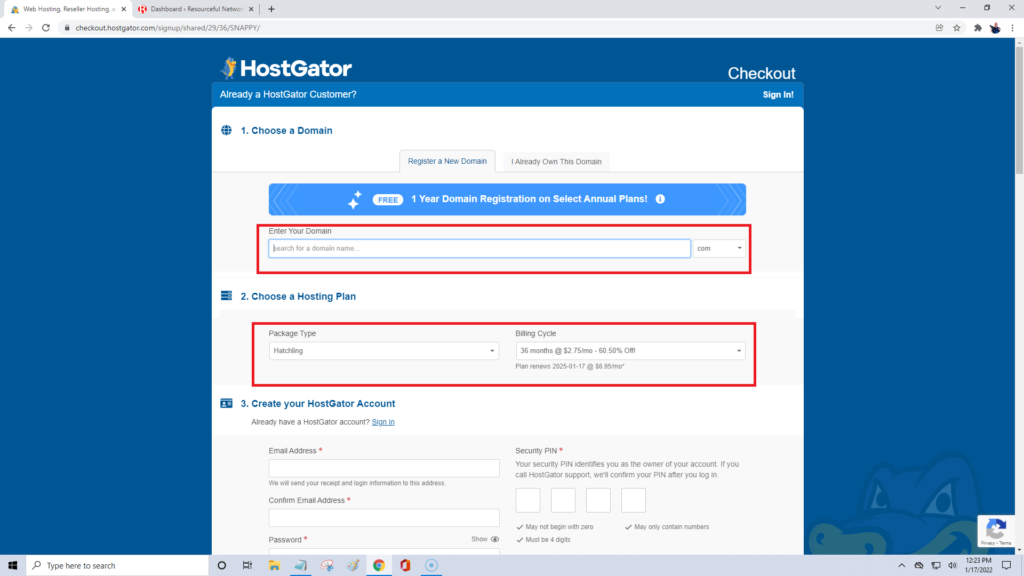
Once you have picked out your domain name you want to enter it in the field shown above. If it is not available (which happens sometimes) it will say unavailable and you will unfortunately have to pick something different 🙁
Choose your hosting package next, it should already be selected from the first step but if you change your mind and want to do a different plan you can do this now. Keep in mind that the longer billing cycle you choose, the better price you will get!
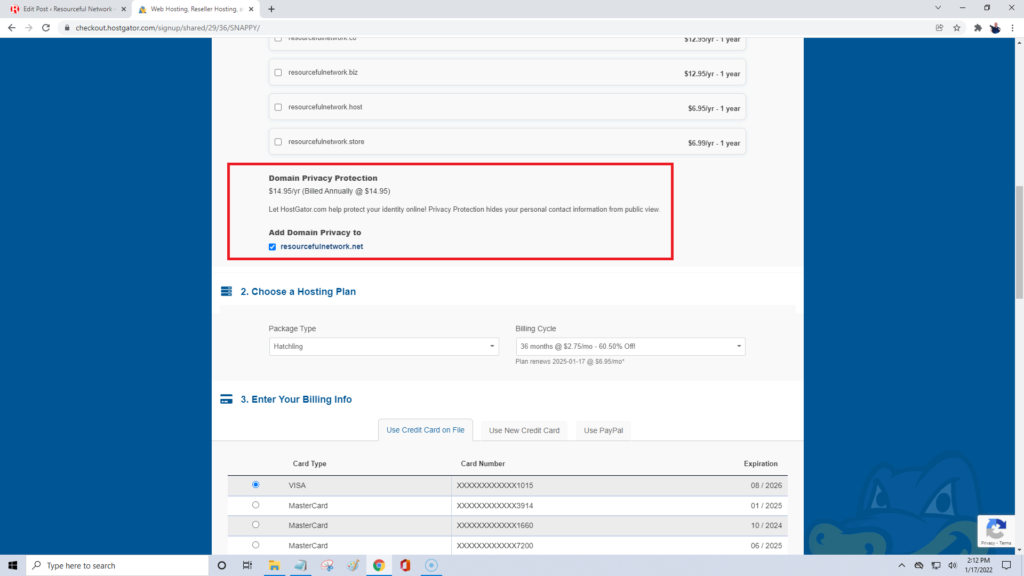
You now will have the option of choosing if you want domain privacy protection. This will keep your information private and we highly recommend it. If you choose to not purchase it, be prepared to get a ton of spam emails from people trying to offer you website building services and apps. It’s very annoying !
Next you will want to setup your account details. We are using HostGator in this example because we have used them for years without any issues. You’ll be asked to enter your email, a password and a security pin.
Enter all of your billing information. You can pay for the domain name and hosting services with a credit card or through PayPal.
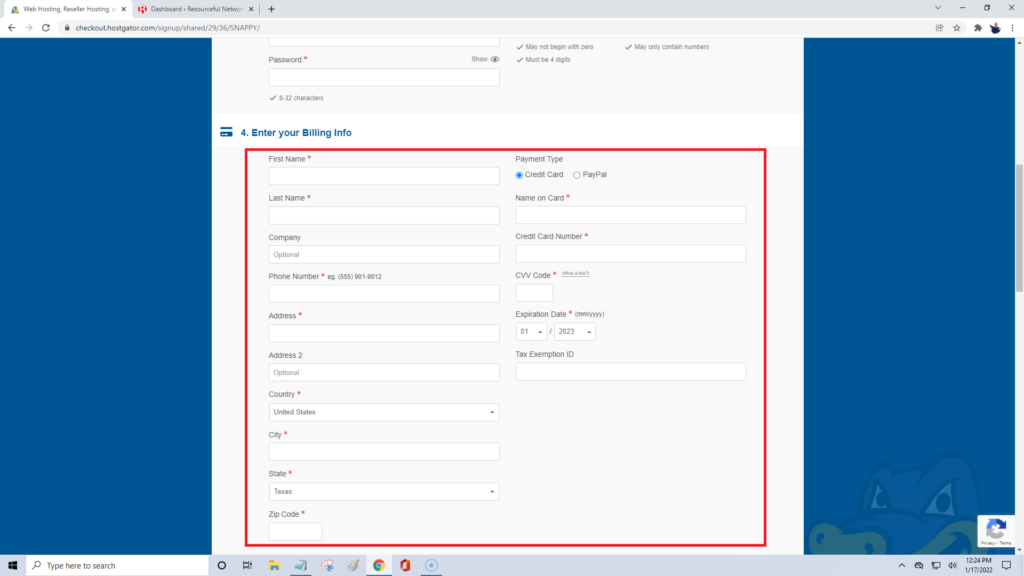
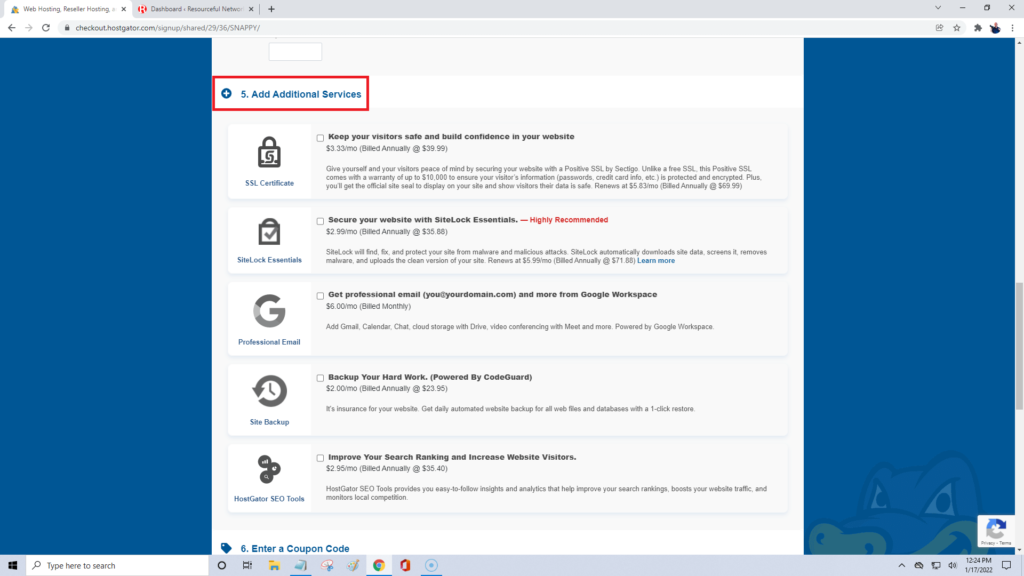
The next section will be for adding additional services. We choose not to select any extras at this time because we can do all of this on our own without buying them, however, if you want to purchase any of the additional services it is entirely up to you.
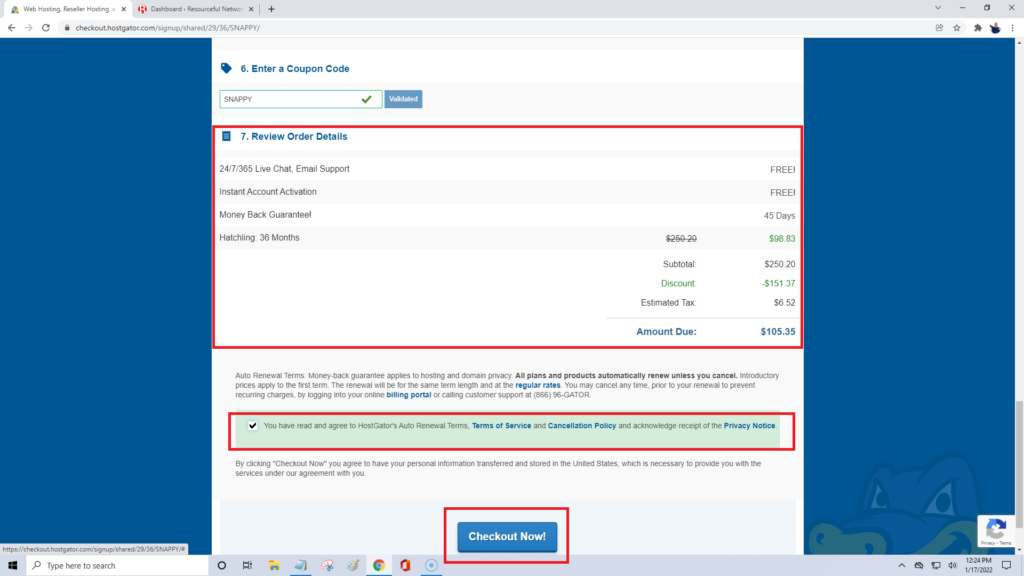
Review your order details, check the box that you agree to all the terms and conditions and then click checkout now.
Step 3: Install WordPress
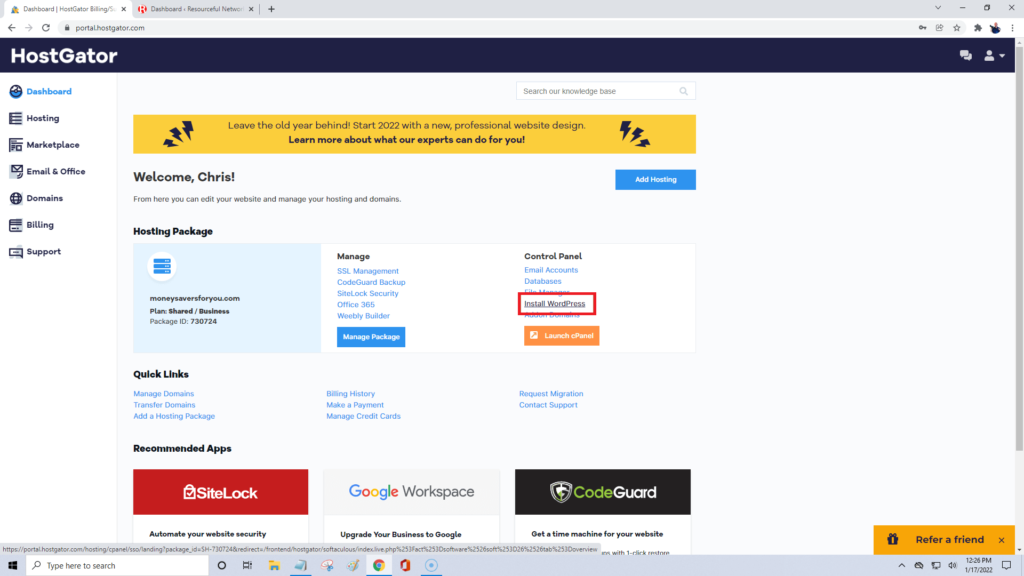
Installing WordPress through HostGator is easy, from your HostGator customer dashboard you just click on Install WordPress.
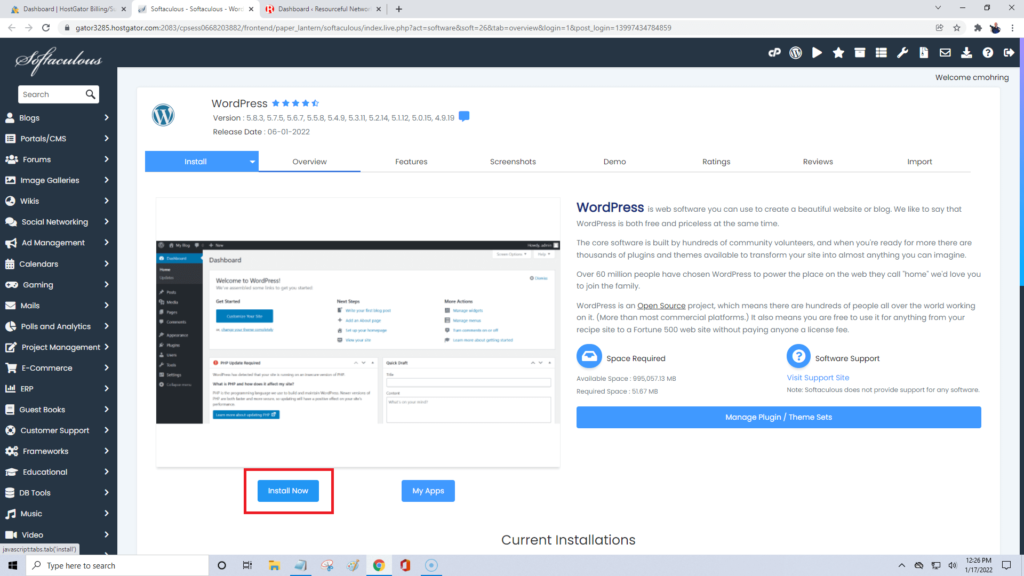
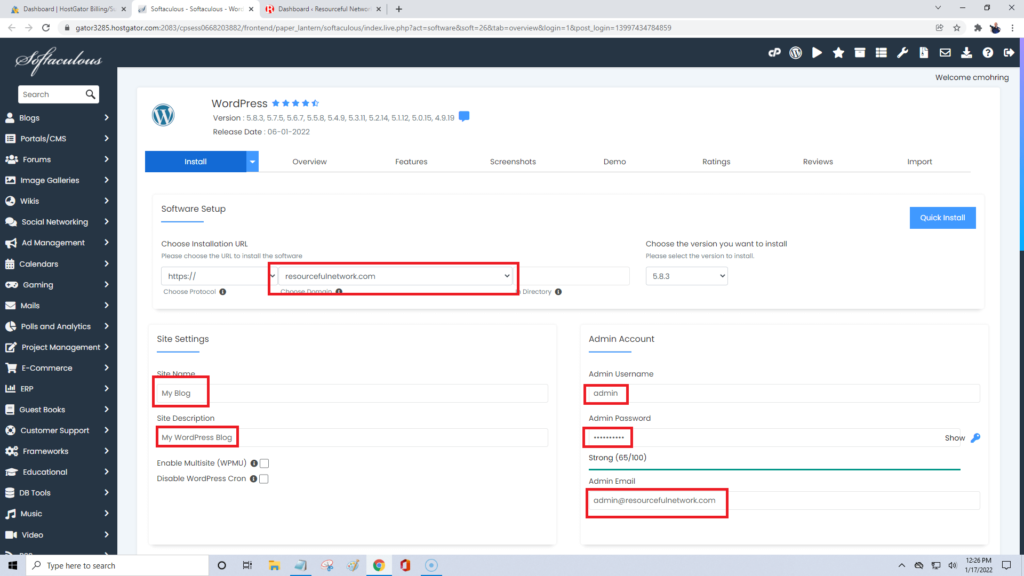
Choose your installation URL. If this is your first time, it should already be in there. Leave the directory field BLANK (this is important!)
Choose the version you want to install. It should already be on the latest version so if you click the dropdown it should be the top choice.
Enter your site name and site description (we can also add or change these later so it’s not super important)
Under the admin account enter a username and password. It would probably be a good idea to write these down somewhere because you will need them to log into the backend of your new website!
Change the admin email to an email that you can check. You can change this in your WordPress dashboard later if needed.
Select your language.
Skip over the select plugins, advanced options or the select themes sections, we’re going to add this stuff in manually in a later step.
Scroll to the bottom of the page and click install
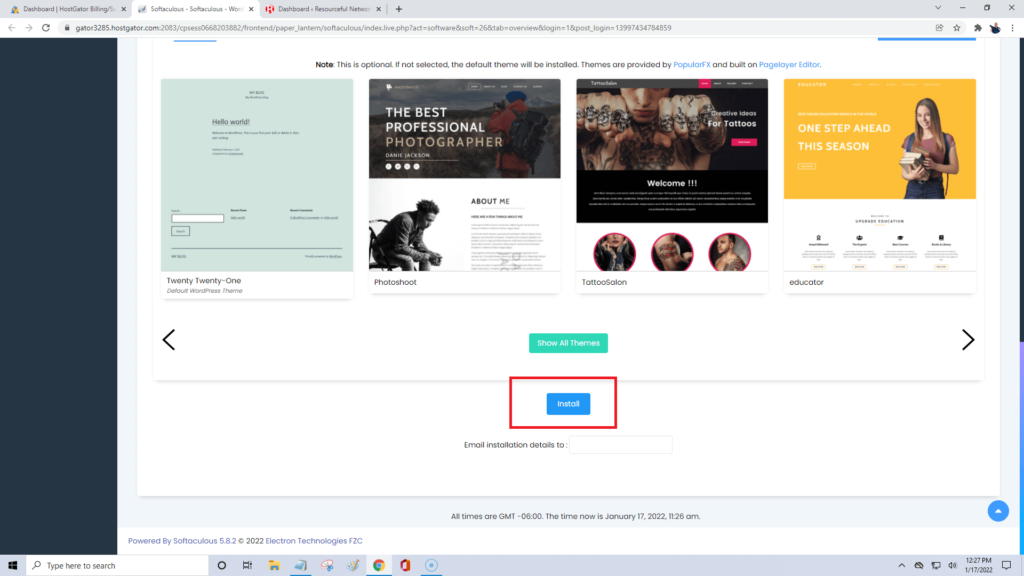
It should only take a few minutes to install WordPress.
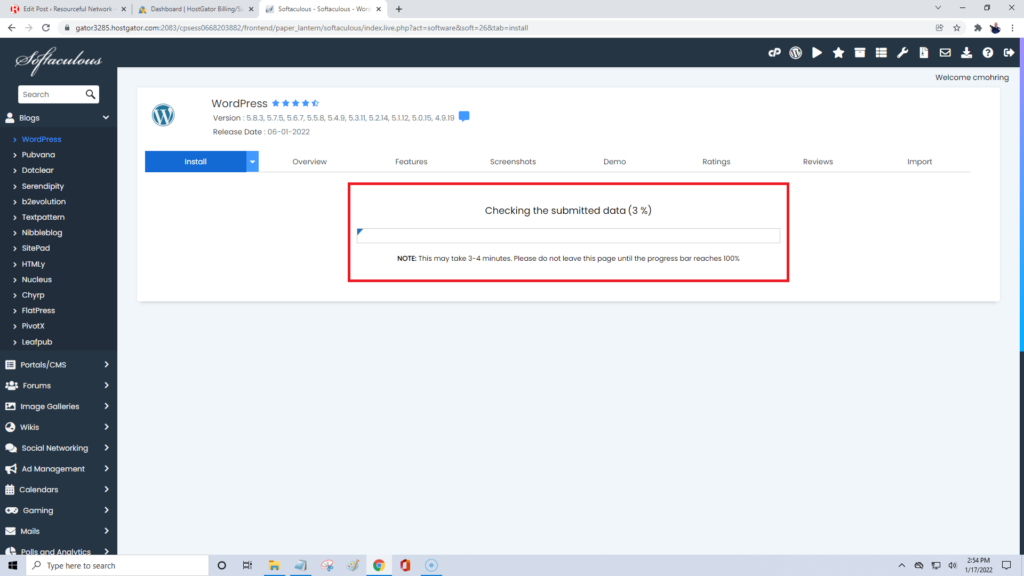
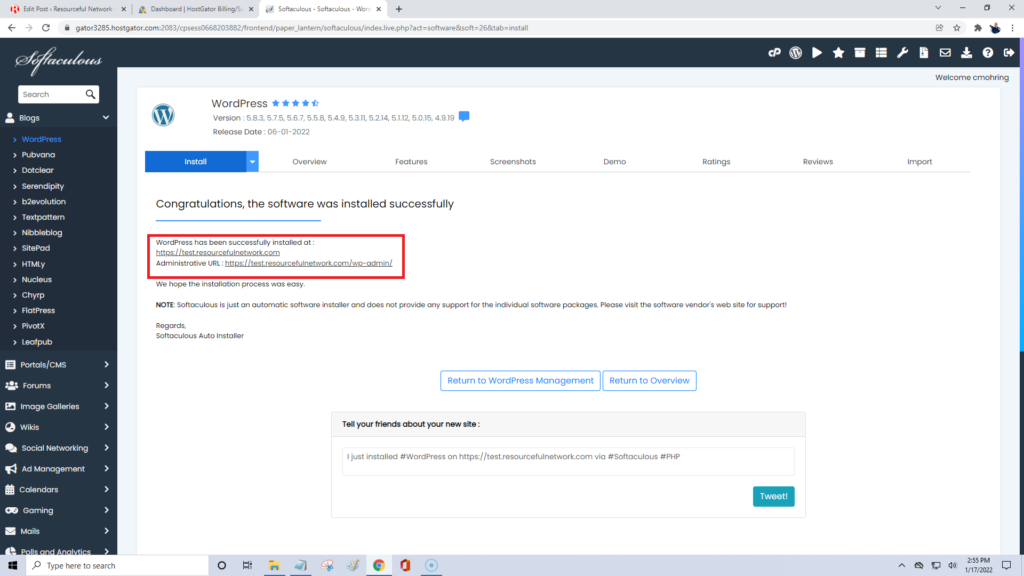
You should now see a screen like the one below that says Congratulations, the software was successfully installed.
There will be two web addresses shown, one is your main site’s web address and the other one is the important one, your website’s administration URL. It should be whatever your website’s name is /wp-admin.
You may want to bookmark this as it is the address you will need to log into your WordPress dashboard to make all the changes to your site and to upload and add all of your content, so it’s kind of a big deal!
Click on the administrative URL and it should take you to the WordPress Dashboard! Awesome job!
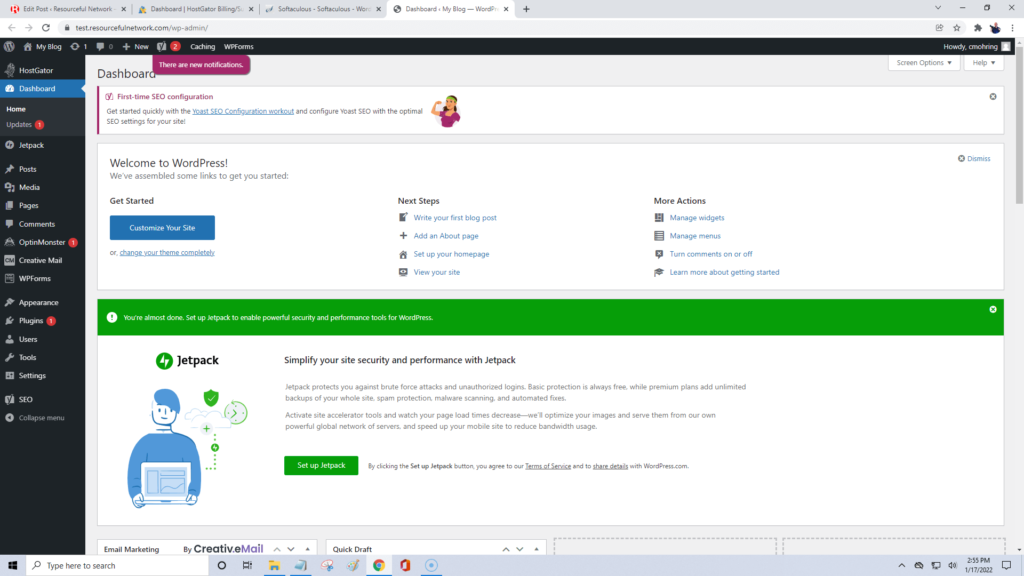
*Note – sometimes you will get an error screen that says site not secure or site not found. If this happens, it means that your website hasn’t fully propagated through the internet yet. Wait about 15 minutes or so and click on your administrative URL again. On a rare occasion, this could take up to 24 hours but from our experience it either works immediately or within 10-20 minutes.
Step 4: Configure Your Travel Blog Settings
There are only a few important settings just starting out that we will need to be concerned with, mostly your blog title and description, a few discussion settings and your link structure. Don’t worry, it’s not confusing and only takes a few minutes.
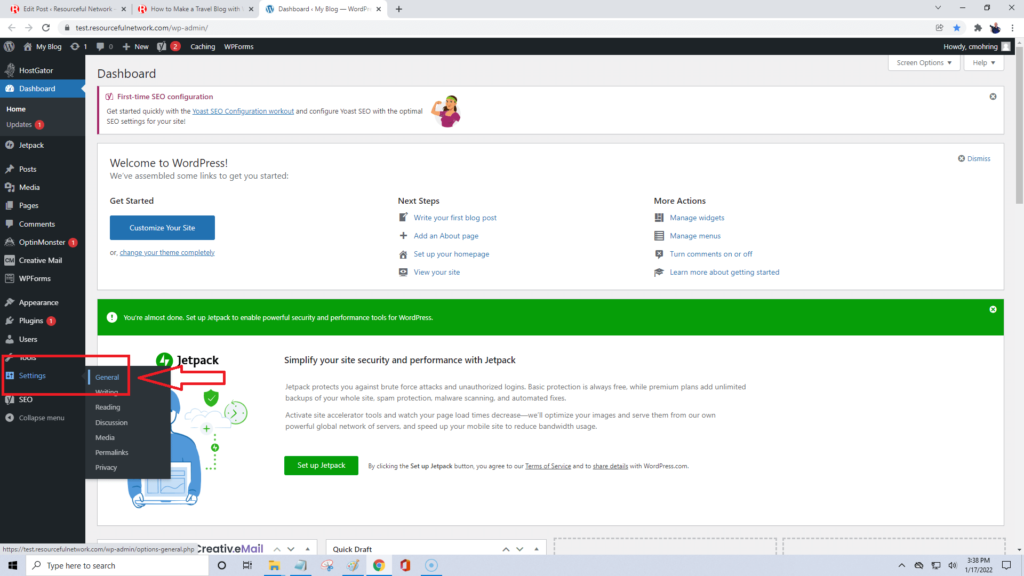
Let’s double check and/or change our site title, tagline and admin email address by going to the left hand menu in your WordPress dashboard and clicking Settings > General
Set your site title and tagline if it isn’t already populated, make sure your WordPress and site address URL’s are the same then check your admin email address. This is the email address that you will receive notifications at if something goes wrong with your site.
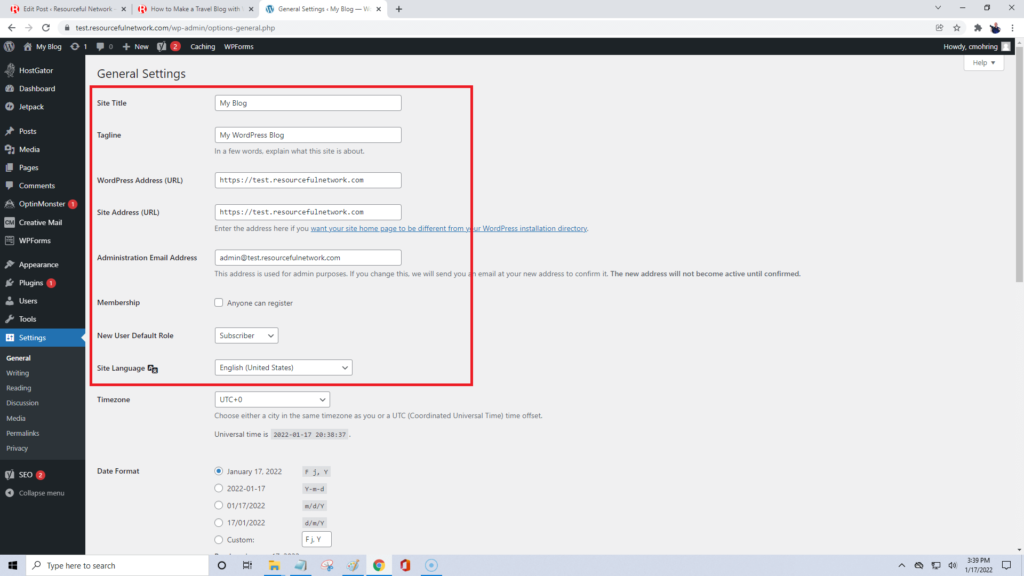
Leave the membership registration unchecked, new user default role to subscriber and set your site language to whatever is needed, we use English.
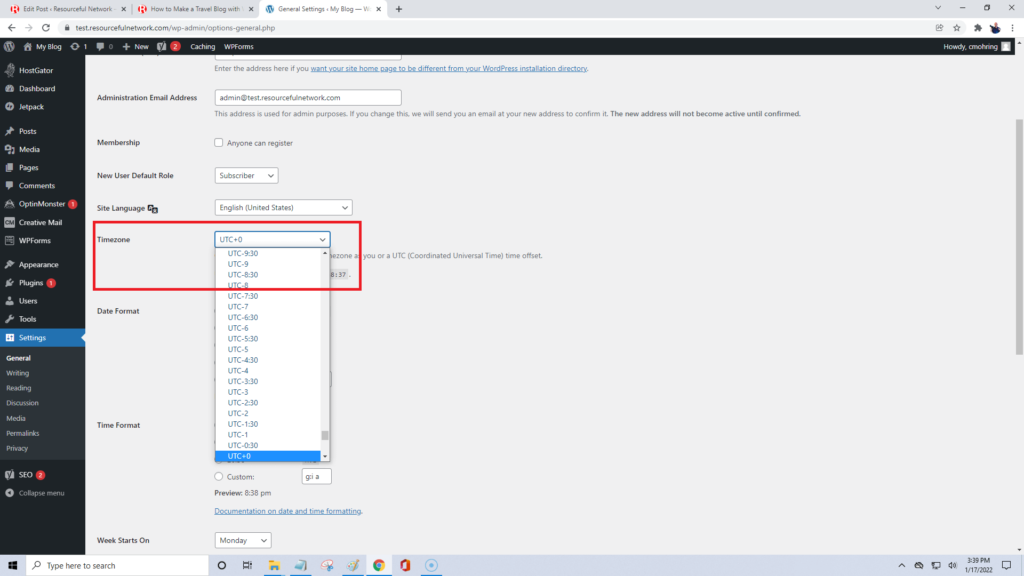
Set your timezone, we use Detroit as we are in the eastern timezone.
Set how you want your time and date displayed. This is all personal preference and we just leave it how it comes.
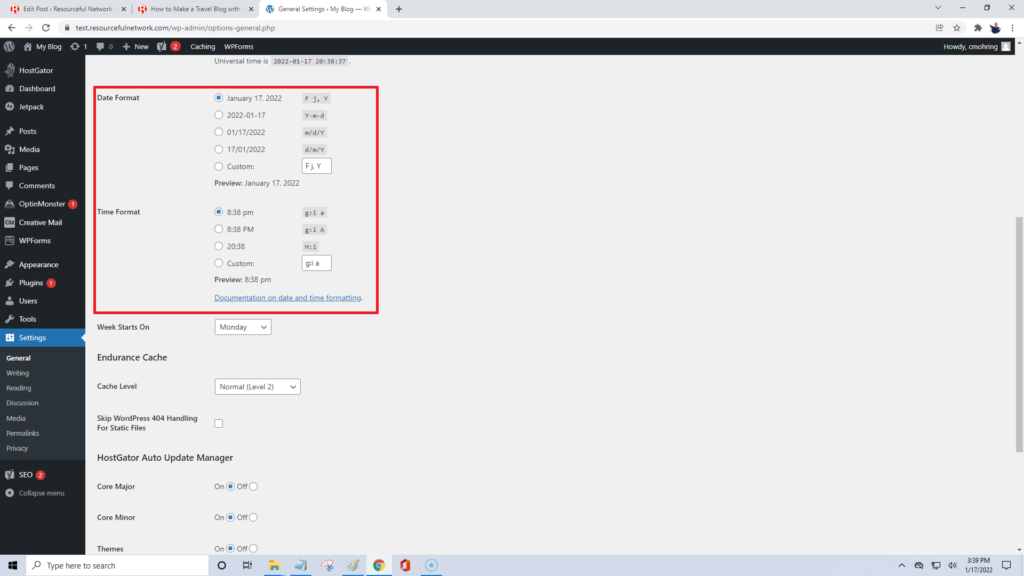
We leave the rest of the settings alone and go to the bottom of the page and click save changes.
Next we’ll change the discussion settings so click on settings > discussion on the left toolbar of your dashboard.
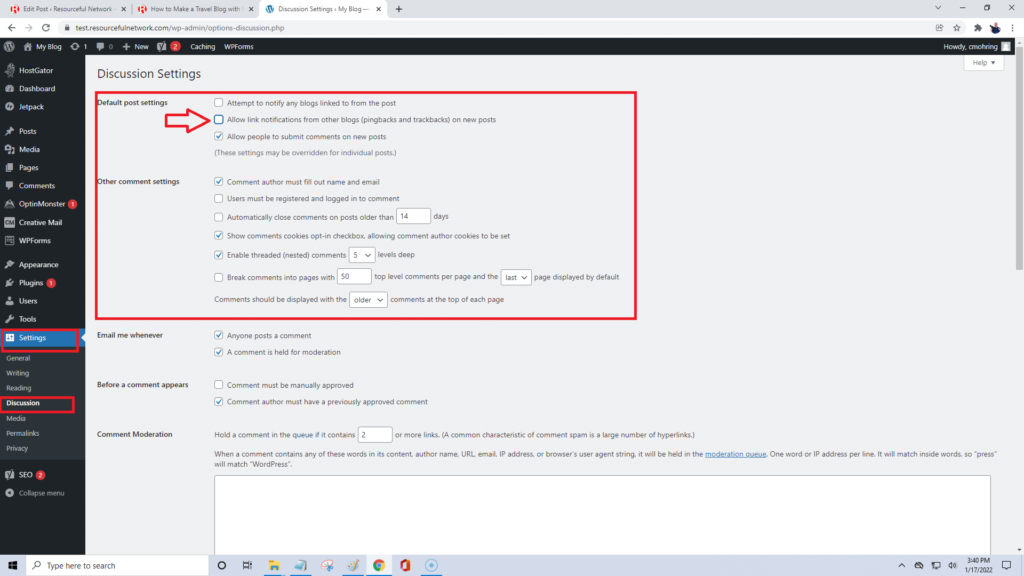
Uncheck the top two settings and scroll down to the bottom and click save changes.
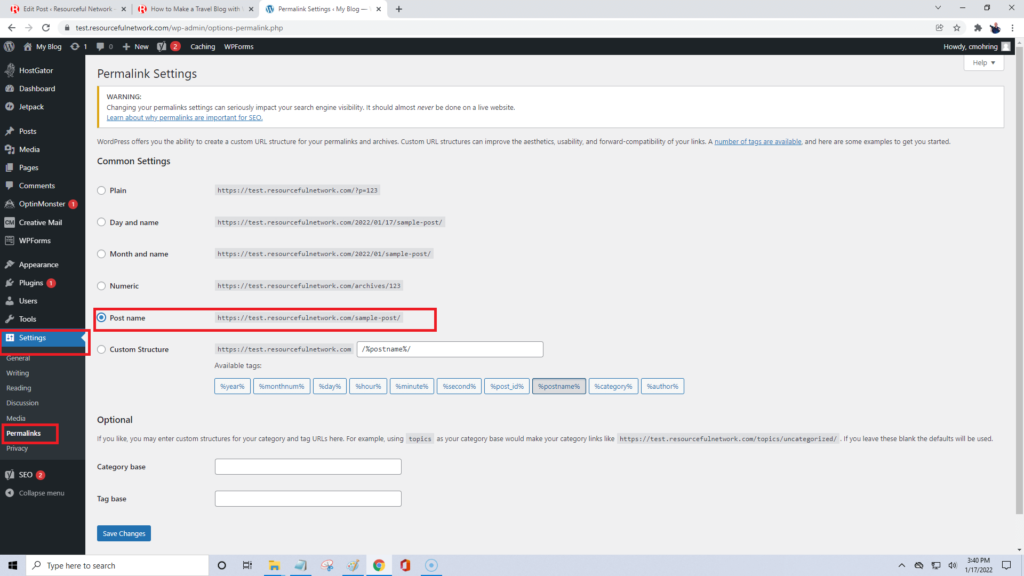
Lastly we’ll change our permalink structure to postname so click on settings > permalinks
Click the circle next to postname and click save changes at the bottom of the screen.
That’s all for the settings for now. We can always come back and modify them later. The reading and writing settings we can leave alone until we have uploaded some content so we’ll change them later.
Step 5: Install Plugins
What’s a plugin? It’s basically a piece of software like an app you would have on your phone and will help improve the functionality, customization and security of your travel blog. We’re only going to install a few to start with to help us build our pages a little easier but first we need to deactivate and delete the ones that come pre-installed.
Go to your left side menu and click plugins > installed plugins.
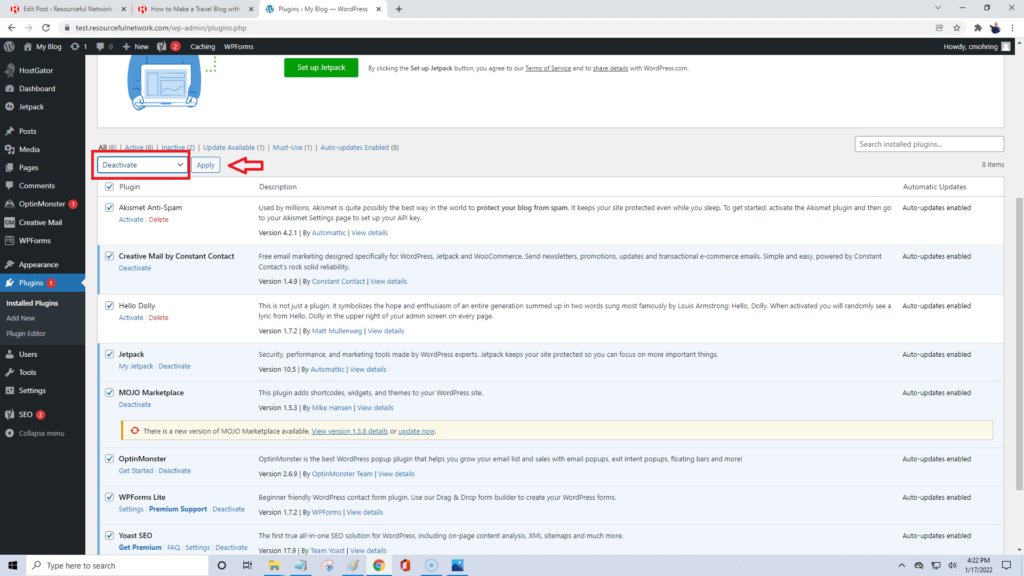
Check them all and in the dropdown click on deactivate and then click the apply button.
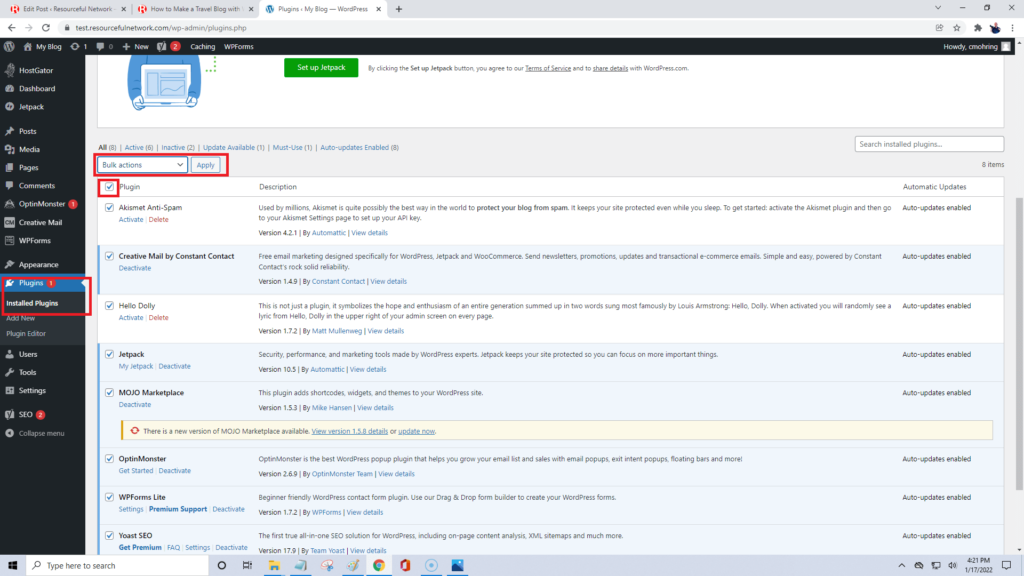
Select them all one more time and then in the dropdown click delete and then click apply. A popup will say are you sure? Click yes.
Now we’re going to add a plugin, just one. As we build out our site we will add more but for now go to plugins > add new and we’re going to search for a plugin called Elementor Page Builder by Elementor.com. It has over 5,000,000 installations and is ranked as one of the top page builder plugins out there!
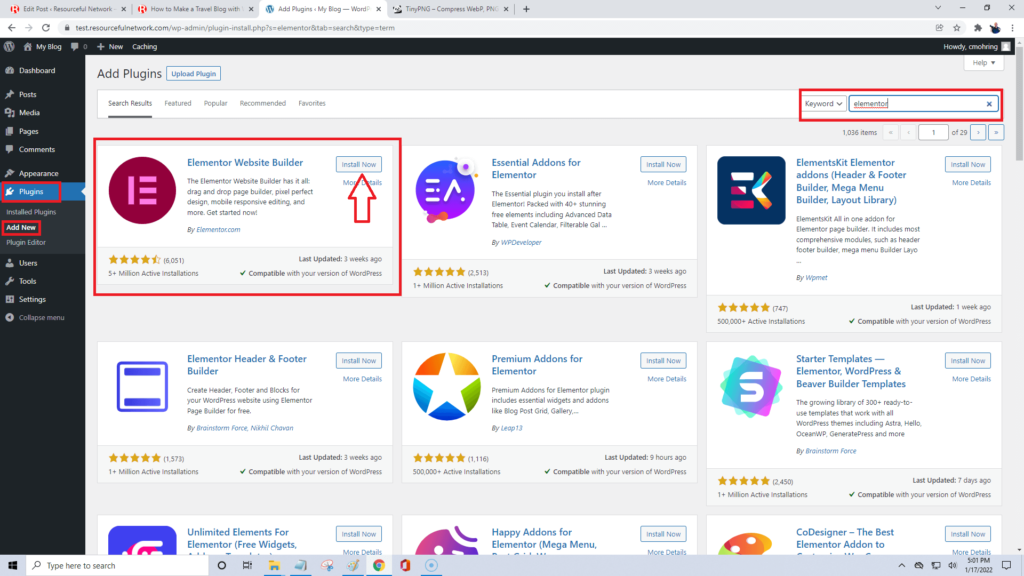
Click on install now and it will automatically install the page builder. Once installed you will want to click on activate as shown below.
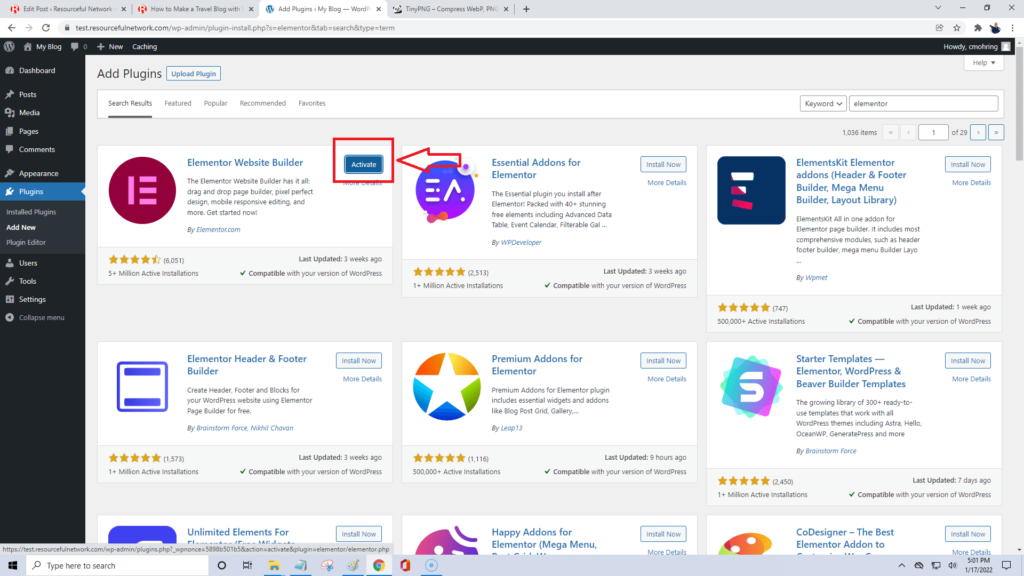
That’s it! You can use this same process to install any plugins you may need for your site functionality and design help. A good security plugin and an SEO plugin are highly recommended. We’ll install them at a later date. Our next step is to install a WordPress theme.
Step 6: Install a Theme
Here’s another one of those there are thousands of choices… Themes… A theme is basically a professionally designed template that will help with the design of your travel blog and allow you to customize the appearance.
A few worth mentioning are Astra, Hello Elementor, Sinatra and Ocean WP. We use Hello Elementor and Astra for most of the sites we build.
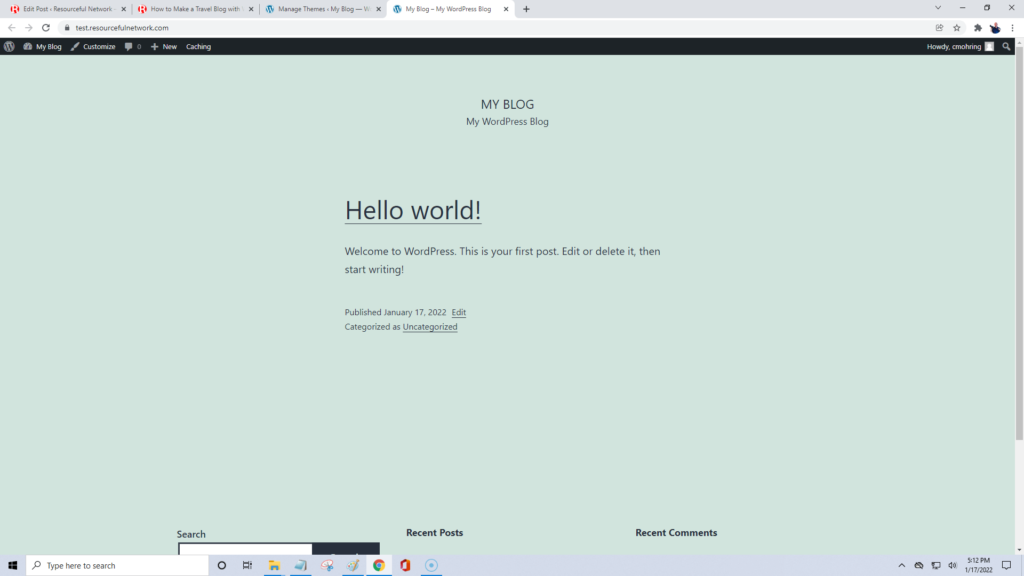
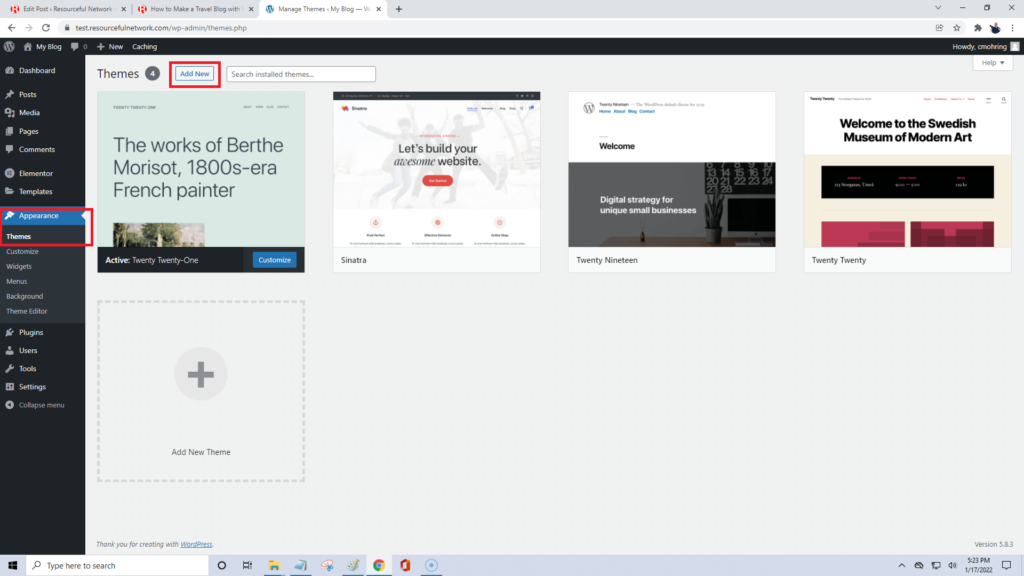
On your dashboard navigate to appearance > themes , click on add new.
In the search box type in Astra. This is one of the best free themes out there and also has a paid upgrade for even more options. Right now we will just use the free version of Astra.
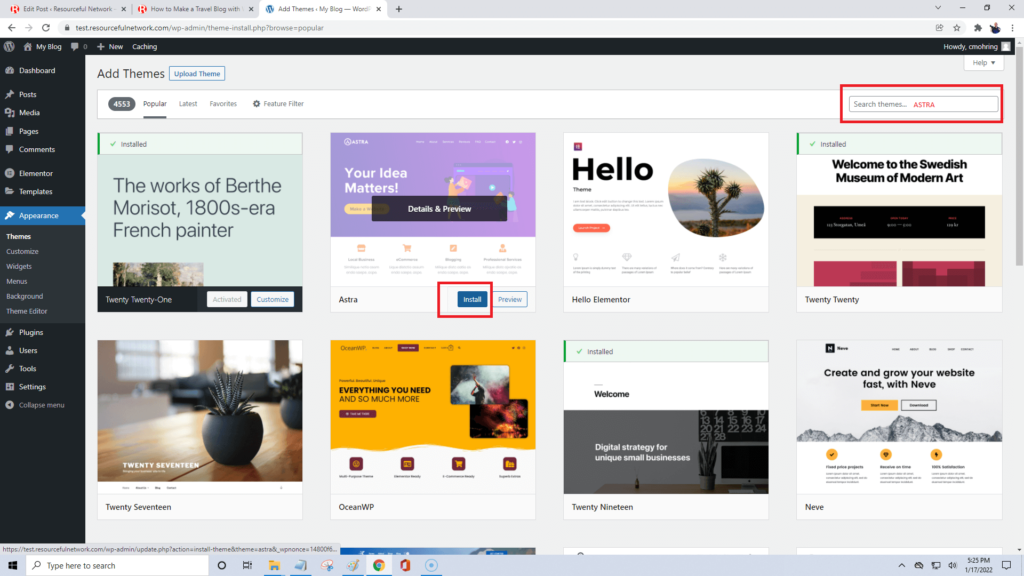
Once it loads up from the search, click on install and then activate.
Once it is activated we can delete the other themes, they will no longer be necessary. Go to appearance > themes and click on theme details of each of the themes (except Astra) then delete. A popup will say are you sure? Click OK. Delete all the themes that are there except for Astra.
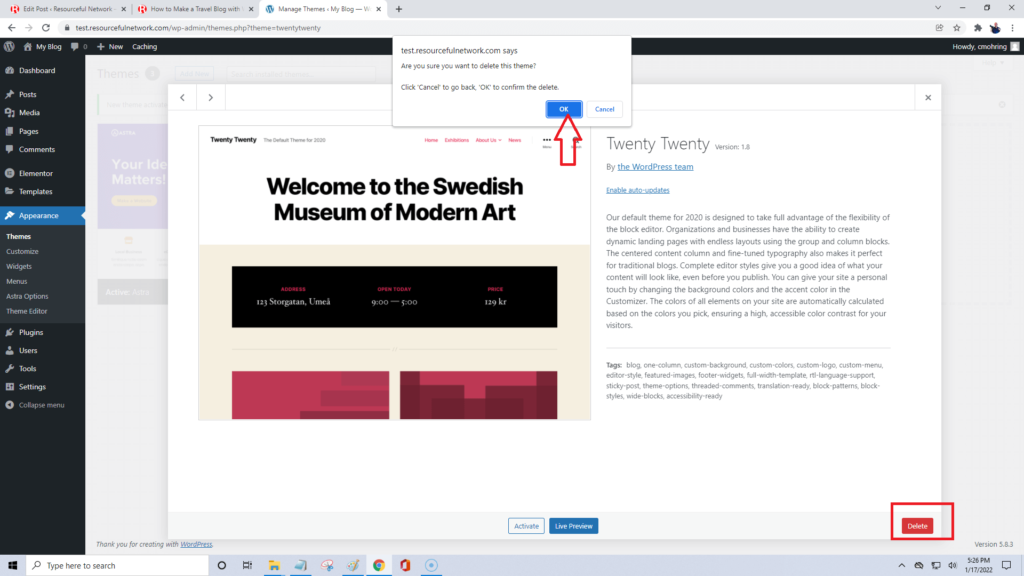
That’s all for this step, we have successfully installed a theme and deleted the unnecessary ones. On to step 7 which is adding pages.
Step 7: Adding Pages to Your WordPress Blog
This is my favorite part, actually creating the stuff that your viewers will see. Adding pages, images and content.
What pages should my blog have? A good start would be the following:
- About
- Contact
- Disclaimer
- Privacy Policy
- Terms of Service
- Start Here or Home Page
- 404 Page
- Blog
- Gallery
From your dashboard on the left go to pages > add new.
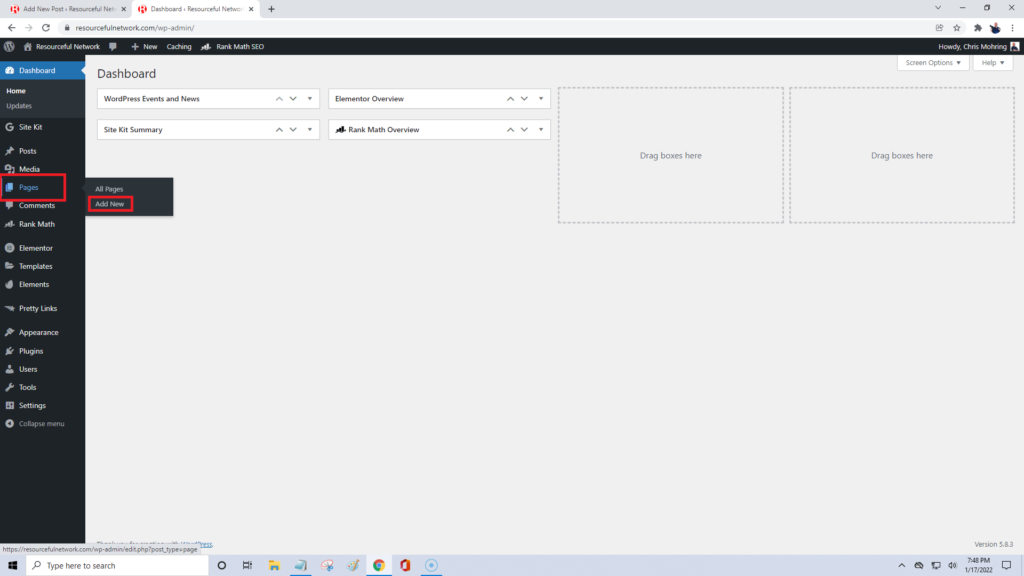
You can also access the menu in the top toolbar. Hover over the +New and select page.
Your new page will appear where you can add your title, all of your content, images, videos, etc.
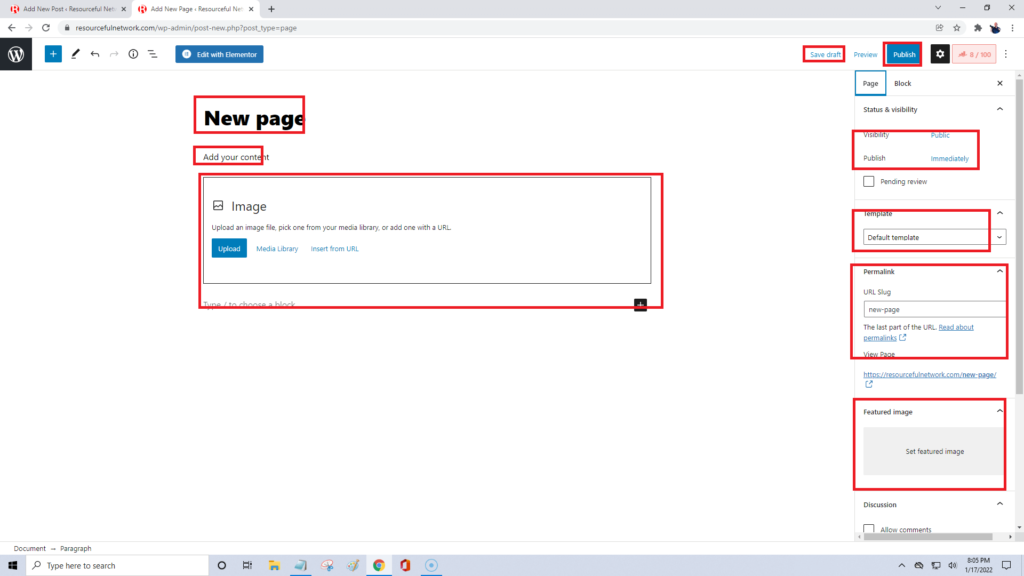
Set visibility, template, permalinks and maybe add a featured image. Choose whether to allow comments and set page attributes if needed.
You can now choose to save it as a draft or publish it. If you choose publish your new page will be live for all the world to see 🙂
Repeat this process for each page you want to create. At minimum you should probably at least have a Home Page, Blog Page, an About Page and a Contact Page. This will get you started, remember you can always add more pages in the future!
Check out the complete video at the top of this article for the nuts and bolts of designing all the pages we created for this travel blog. You’ll want to add your logo and site favicon to the header also!
We also need to tell WordPress to display the home page we created as the front page.
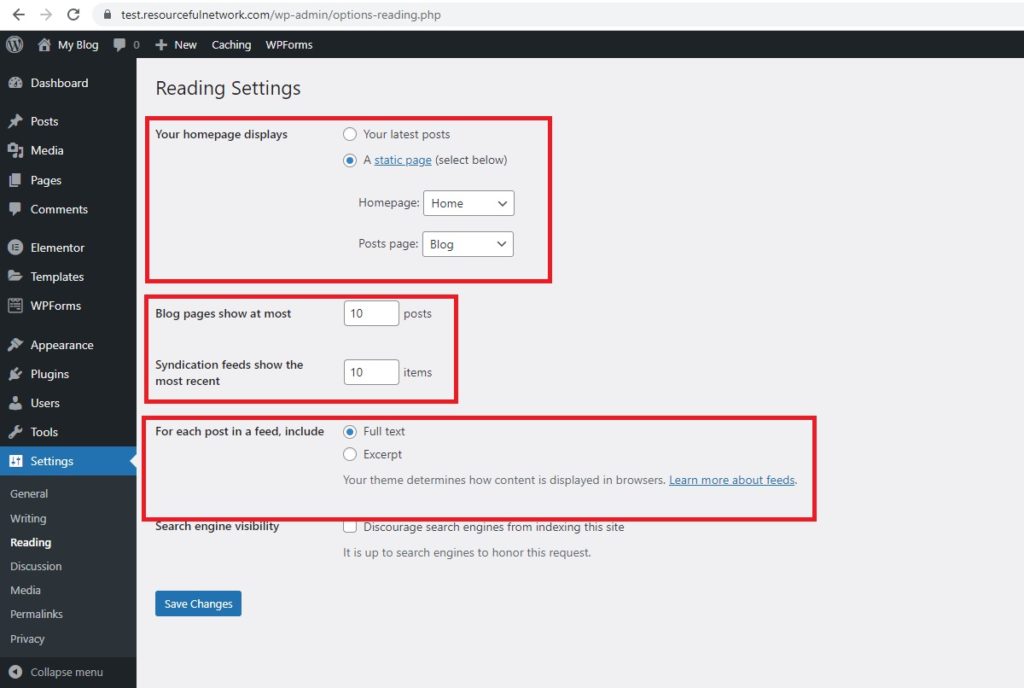
Go to your dashboard and on the left go to settings > reading. Where it says your homepage displays change this to a static page and then in the dropdown select the page called Home.
The next setting is to tell WordPress to display all of our blog posts on the blog page. From the same settings page, select Blog in the dropdown next to Posts Page.
You can change the amount of posts that show up in your blog or feed. We normally just leave this on the default 10 posts.
For the each post in feed section we normally change this from show full post to show excerpt.
Don’t forget to save your changes!
Now your site will show the home page as the page that shows up when someone types in your web address in their browser and when they click on the blog page it will show all of your latest blog posts!
Step 8: Final Adjustments to Your Travel Blog
Once everything is setup it’s time to check to make sure your blog looks great on all devices it can be shown on. In the video tutorial above we show you how to do this page by page.
This may mean that you might have to make some tweaks to the design, especially for mobile view. This is the last step and hopefully you didn’t run into any issues. Most of the time to fix anything that looks off is as simple as changing mobile text size or adding padding to your columns.
Wrapping Up
That wraps up our guide on How to Start a Travel Blog. We’d love to see your creation! If you have any questions on making a travel blog, let us know in the comments below or send us a quick message here.
Check out our resources page for the tools that you will need mentioned in this article.

